In this post we are going to install a private Certification Authority (CA), request a certificate from an Exchange server computer, create the certificate, deploy it to all domain joined computers and complete the pending request on the Exchange server computer.
Installing a private Certification Authority
To issue our own certificate we need what is called a Certification Authority (CA). These certificates issued by our own CA are great for testing purposes (internal applications, etc…), however for external applications public sites, etc. you will need a commercial certificate.
To install our private Certificate Authority we need to install the Active Directory Certificate Services (AD CS) role. Therefore, let us start by opening the server manager and select Add Roles. If you need help installing roles and features check here for Windows server 2012 and here for windows server 2008 R2.
On Select Server Roles page, click on the Active Directory Certificate Services checkbox. If you are prompt to add required features, add them. Click Next.

On the Introduction to Active Directory Certificate Services page, read the information provided and click Next.

On the Select Role Services page, Make sure the Certification Authority checkbox is checked and you will need to check the Certification Authority Web Enrollment checkbox as well. The Web Enrollment service will provide us with a web interface that will allow us to manage certificates (request, renew, etc.).

After checking the web enrollment service you will be prompt to add some required role services and features. Click the Add Required Role Services button.

Back on the Select Role Services page, click Next.

On the Specify Setup Type page, select between: Enterprise CA if your computer is member of a domain and can use AD services, and Standalone CA if your CA computer cannot use AD services. Note: you can still use the certificate issued by a Standalone CA on your domain (later in this post I’ll show how to deploy a certificate to all your domain computers). Click Next.

On the Specify CA Type page, select Root CA, a Root CA is the first CA that you install, so if you decide to install multiple CAs the Root CA will be the CA with highest authority, in other words the Root CA establishes the foundation and basic rules that govern certificate issuance and use for your entire Public Key Infrastructure. Click Next.

On the Set Up Private Key page, click on Create a new private key. Click Next.

On the Configure Cryptography for CA page, select a Cryptographic Service Provider and select the hash algorithm for signing certificate (Wikipedia: Secure Hash Algorithm) and the Key character length. Click Next.

On the Configure CA Name page, change the Common name for the CA if you wish to, I would recommend you to leave it with the default name. Click Next.

On the Set Validity Period page, select the time you wish for your certificate to be valid. Click Next.

On the Configure Certificate Database page, leave the default location and click Next.

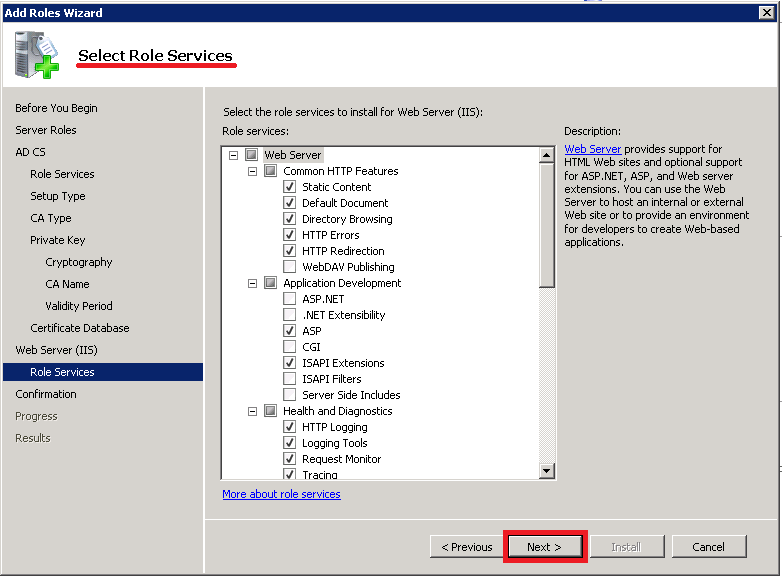
On the Introduction to Web Server (IIS) page, read the information provided and click Next.

On the Select Role Services page, click Next.
On the Confirmation page, review your settings and click Install.

On the Installation Progress page you can see the progress of the Installation.

On the Installation Results page, verify that the installation finished successfully and click Close.

Note that the step shown above are for a Windows Server 2008 R2. If you are using Windows server 2012 or higher, first you will have to install the Active Directory Certificate Services (CA CS) Role, select the Role Services Certification Authority and Certification Authority Web Enrollment services.

Then, after the CA CS Installation is completed, you will need to configure AD CS. You can do this by clicking the Link Configure Active Directory Certificate Services on the destination server.

Or by click the link with the same name on the Server Manager Notifications.

The AD CS configuration windows will open. On the Credential pages change the credentials according to the role service you want to install. Click Next.

On the Role Services page, check on the Certification Authority and Certification Authority Web Enrollment checkboxes. Click Next.

On the Setup Type page, select between: Enterprise CA and Standalone CA, in my case this server is not a member of any domain therefore I can only install the Standalone CA. Click Next.

On the CA Type page, select Root CA. Click Next.

On the Private Key page, click on Create a new private key. Click Next.

On the Configure Cryptography for CA page, select a Cryptographic Service, the hash algorithm for signing certificate and the Key character length. Click Next.

The rest of the options are similar to the ones we set for the CA on the Windows server 2008 R2 computer. CA Name, Validity Period, Database Location, Confirmation, Progress and Results. Just click Next on each.

Requesting a Certificate in Exchange Server
To request a certificate in Exchange server you can do it through the Exchange Management Console, On Server Configuration. Click the link New Exchange Certificate… on the right pane.

However the fastest and easiest way to request a certificate is with the Exchange Management Shell and running the following command:
New-ExchangeCertificate -FriendlyName "Name for your Certificate" -IncludeServerFQDN -DomainName <name>.contoso.com,autodiscover.contoso.com,webmail.contoso.com -GenerateRequest -PrivateKeyExportable $true

Copy the output of the command from the line —–BEGIN NEW CERTIFICATE REQUEST—– until to the line —–END NEW CERTIFICATE REQUEST—–. Make sure you copy and keep it on your notepad as we need this to create the certificate.

On the Exchange Management Console you will notice that the new certificate request is listed as a pending certificate.
Create the Certificate for the Exchange Server
To create a new certificate on your CA computer open your web browser and open the following page:
http://server-ca/certsrv

<server-ca> is the name of your CA server

Note: you can also access by opening Internet Information Services (IIS) Manager. There expand the ServerName, Sites, Default Web Site, right click on CertSrv select Manage Application and click on Browse.

On the CertSrv Web page of your AD CS, click on the Request a Certificate link.

On the Request a Certificate page click on the link advance certificate request.

On the Submit a Certificate Request or Renewal Request page, we need to do a few things. On Saved Request, paste the certificate request we got from our exchange server on the text block next to Base-64-encoded certificate request. On Certificate Template select Web Server. Leave Additional Attributes empty. Click the Submit > button.

On the Certificate Issued page. Click on the link Download Certificate.

You got your certificate.

Complete a Pending Certificate Request
Back on your exchange server computer open the Exchange Management Console and go to Server Configuration. There right-click the certificate request you created and select Complete Pending Request… (you can also click the right panel link Complete Pending Request…).

On the Complete Pending Request windows, Introduction page, browse for the Certificate you downloaded from your Certification Authority. Click Complete.

On the Completion page, verify that the certificate was installed successfully. Click Finish.

Now that you certificate is installed, you might notice that your certificate appears to be invalid.

If your certificate comes from an Enterprise CA (joined to the domain) you might just need to speed up the process a bit (it takes a few hours for the DC to distribute the Trusted Toot CAs to all domain joined computers). To speed up this process, open the command prompt on your exchange server and run the following command:
gpupdate /force
If you have a Standalone CA you will need to deploy the Root certificate of your Standalone CA to all domain joined computers.
Deploy a Root Certificate to all Domain Computers using Group Policy
To deploy your Root certificate first you will need to export the certificate. Go to your Standalone CA computer and open the Microsoft Management Console (MMC). If you don’t know how click the Windows_button+r, write mmc and click OK.

On the MMC console click on File and select Add/Remove Snap-in…. There select Certificates and click Add>>.

On the Certificate Snap-in window select Compute account. Click Next.

On the Select Computer window select Local computer. Click Finish.

On the Add or Remove Snap-in window the Certificates (Local-Computer) must be on the Selected Snap-ins side. Click Ok.

Now on MMC, expand Certificates (Local Computer) > Trusted Root Certification Authorities. There on the center panel select and right-click to the certificate that was created when installed your CA, select All Tasks and click Export….

On the Certificate Export Wizard, Welcome page click Next.

On the Export File Format page click Next.

On the File to Export page, write a path and a name for your Root Certificate.

On the Completing the Certificate Export Wizard page, click Finish.

You will get a pop-up indicating that the export was successful.

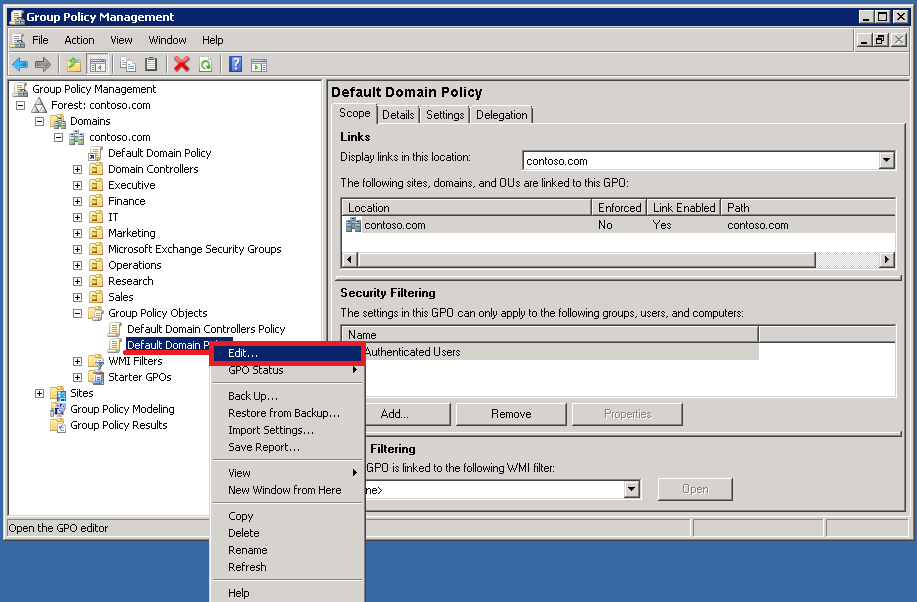
Now let’s go back to the DC computer. Open Group Policy Management.

Expand Group Policy Objects, right-click Default Domain Policy and click Edit….
On the Group Policy Management Editor, expand Computer Configuration > Policies > Windows Settings > Security Settings > Public Key Policies > Trusted Root Certification Authorities.

Right-click on Trusted Root Certification Authorities or to the right pane and select Import….

On the Certificate Import Wizard’s Welcome page click Next.

On the File to Import page browse to the file we export from our Standalone Root CA. Click Next.

On the Certificate Store page, click Next.

Finally on the last page click Finish.

Click OK on the successful import notification.

Your Certificate should be on the Trusted Root Certification Authorities folder, of your Group Policy Manager Editor.

On your DC open MMC > Certificates (Local Computer). Verify your Certificate in on the Trusted Root Certification Authorities folder. If you cannot find it there, Open the command prompt and run gpupdate /force to speed up the process as explained above.

Refresh the Trusted Root Certification Authorities folder of your MMC. The new certificate should be there.

Back on your Exchange computer, repeat the last few steps. Open MMC > Certificates (Local Computer). Verify the new certificate is there, if still not there open the command prompt and run gpupdate /force, refresh the Trusted Root Certification Authorities folder. The new certificate should be there.
Now if you open Exchange Management Console > Server Configurations, you will see the new Certificate is Valid.

However, we still need to assign some services to this certificate. To do this select the certificate, right-click on it and select Assign Services to Certificate…. Or click the lick with the same name on the right panel.

On the Assign Services to Certificate window, Select Server page, select the server you wish to assign the services and click Next.

On the Select Services page, select the services you wish to assign and click Next.

On the Assign Services page click Assign.

On the Completion page click Finish.

After you install Exchange server on your computer and access to Outlook Web App (OWA) now called (Outlook on the web), you might have notice that you get a certification error. Now with the out certificate installed this error won’t be there.

This concludes the Certification Authority Lab, I hope you liked it.

[…] I had tested Paul’s script in Exchange Server 2010 and 2013, unfortunately in Exchange 2010 we will need to install a certificate for the script to work. To install a certificate for our test lab the best is to use a self-signed certificate from our own private Certification Authority (CA). First we will need to install Active Directory Certificate Services (AD CS), request a certificate in Exchange server, and create our certificate with the newly installed CA, here you can find the steps to install AD CS, create a certificate and deploy it. […]